
The Most Economical Way to Drive More Ecommerce Traffic to Your...
By Tom Wintaugh

Want to read this blog offline?
No worries, download the PDF version now and enjoy your reading later...
 Download PDF
The Quick Look feature is becoming a very popular trend among ecommerce websites of all sizes and, at a first glance, one might overlook its true advantages and how it impacts the customer shopping patterns.
The main goal of the feature is to provide two things:
The feature is usually implemented on category and search result pages, but it can also prove its great potential on other applications, like cross selling on the basket screen or providing a gateway to your related or suggested items on product pages.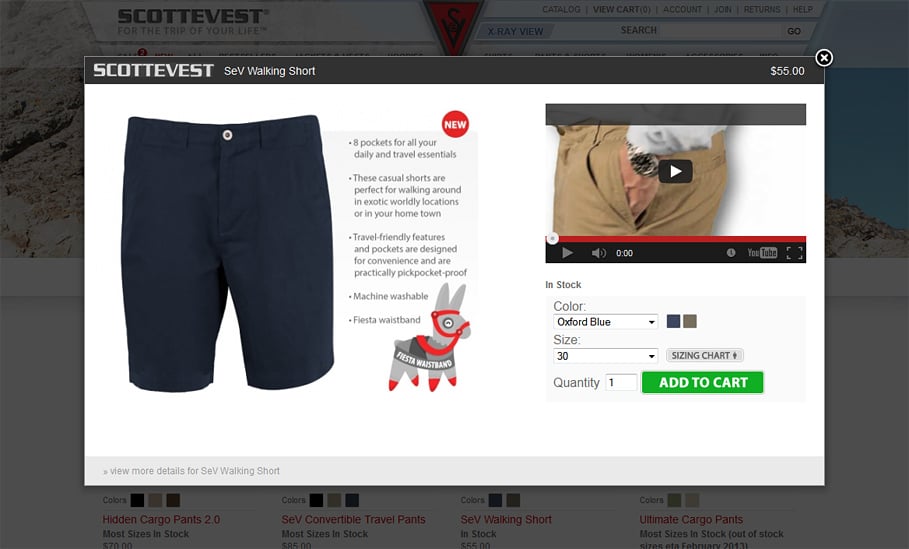
What you’ll need:
In order to keep the code organized, we will be creating a new Miva Content item where the quick look template will reside.
To create a new Miva Content item, click Pages on your Miva Admin left side navigation. Once on the Pages screen, visit the Items tab at the top and click the Add Item button on the top right side of the Items list.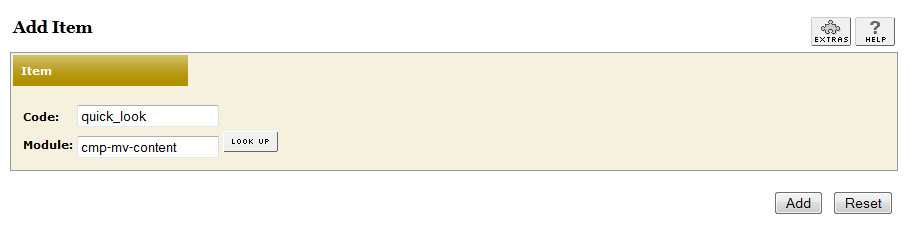
For Code field, type in: quick_look
For the Module field click the Look Up button and in the list that pops up, find and select : cmp-mv-content
Once you have created the new item, navigate to the Pages tab on the Edit Item screen, and assign the new item to the Product Display (PROD) page.
To separate Quick Look visitors from regular product page visitors, we will need to wrap the existing Product Page template in a conditional statement.
Navigate to the Product Display (PROD) page, and add a conditional statement at the top of the page, while placing your existing Product Page template within the else conditional, as denoted below:
    <mvt:if expr="g.quick_look EQ 1">
        <mvt:item name="quick_look" />
    <mvt:else>
        <!— Replace this HTML comment with your existing Product Page template code -->
    </mvt:if>
The code above will basically redirect quick look visitors from seeing your regular product page template, to the new quick_look content item added in the previous step.
While on the Product Display (PROD) page, click the Content (quick_look) tab located at the top and you will be presented with a blank text area, where you can start building the Quick Look template.
The code below is a basic example of a Quick Look template to get you started, however, layout and contents will need to be modified accordingly, to include the information you would like displayed within the Quick Look lightbox window.
<mvt:item name="html_profile" />
<head>
    <title>&mvt:product:name; - &mvt:store:name;</title>
    <META NAME="ROBOTS" CONTENT="NOINDEX, NOFOLLOW">
    <mvt:item name="head" param="head_tag" />
    <mvt:item name="attributemachine" param="head" />
    <mvt:item name="prod_imagemachine" param="head" />
</head>
<body id="quick_look">
    <div id="ql_wrapper">
        <div class="product-details-1">
            <div class="product-image">
                <img id="main_image" alt="&mvte:product:name;" />
            </div>
            <div id="thumbnails" class="thumbnails"></div>
            <mvt:item name="product_display_imagemachine" param="body:product:id" />
        </div>
        <div class="product-details-2">
            <h1>&mvt:product:name;</h1>
            <div class="product-code">Code: &mvt:product:code;</div>
            <div class="product-price">Price: &mvt:product:formatted_price;</div>
            <div id="inventory-message">
                <mvt:if expr="l.settings:product:inv_active">
                    &mvt:product:inv_long;
                </mvt:if>
            </div>
            <form method="post" action="&mvt:global:sessionurl;Screen=BASK">
                <!-- Your add to basket form contents -->
            </form>
        </div>
        <div class="clear"></div>
        <mvt:item name="attributemachine" param="body" />
    </div>
</body>
</html>
Quick Look Template Notes:
Implement your lightbox script of choice on the Category Display (CTGY) or Search (SRCH) page – for this application we used Fancybox.
You will now need to add your Quick Look button and/or text link inside the product loop on your Category Product List Layout template. The link should include, your regular product link, appended with one of the following:
– for SEO-friendly links: ?quick_look=1
– for default, query string based links: &quick_look=1
The completed link should look something like this:
<a title=“Product Name” class=“fancybox” href=”/product_link.html?quick_look=1”>Quick Look</a>
 This should cover all the pieces you need for implementing a quick look feature. While it may require a good amount of development time to get it right, it can easily become a very powerful tool on your Miva Merchant store.
By Tom Wintaugh

By Tom Wintaugh

By Tom Wintaugh
Sign up to receive the latest in ecommerce news, articles, whitepapers, and more.
OR CALL 800.608.MIVA


