
The Results Are In: How Miva Scored in the 2023 Paradigm B2B...
By Miva

Want to read this blog offline?
No worries, download the PDF version now and enjoy your reading later...
 Download PDF
HTTPS has always been a core part of any ecommerce website. If you’re accepting personal information online, including credit cards, you must have an SSL Certificate to encrypt the data. Typically, a website was only served over securely (HTTPS) on Account and Checkout Pages. General shopping and browsing was done over unencrypted HTTP. Over the past couple of years, that is starting to change. Google now prefers the entire site to be served over HTTPS to protect the visitor. They are even giving sites that are all https a small ranking boost.
While serving every page over HTTPS adds some additional server overhead and can cause the page to load slightly slower, the additional time should be unnoticeable to the visitor.
This tutorial will walk you through step by step how to convert your Miva store to be entirely served over HTTPS. While the actual implementation and changes are relatively simple, making sure everything is done correctly is extremely important. If done improperly there are negative customer experiences which can occur, such as getting insecure warnings on pages and negative SEO consequences which can damage your rankings – both of which you want to avoid.
Before you get started…
Before you implement the changes, you’ll want to go through the following checklist of things which will need to be modified once the change is made. You’ll want to make sure you know how to update each of these items once the site is serving all content over HTTPS (or even before). You’ll also use this time to identify potential red flags that will need to be fixed prior or right after the changeover. Having a step-by-step plan will avoid anything getting missed or some last minute chaos trying to track down website or SEO issues.
Here are the things that will need to be updated or looked at once all pages are being served over SSL:
It is a good idea to look at each one of those items above before you make any changes so you have an idea of the extent of the changes that will be needed. For example, if your site has hundreds of hard coded images in your category headers, then you’ll want to have a plan to update those quickly after going all HTTPS.
You should also audit all the 3rd party tracking scripts on your site and ensure that all of them support being called from a secure URL. If they don’t (or you forget to update them), your website visitors will get an “insecure content” warning across your site which is not good.
Implementation Guide
These steps are going to assume you are using Miva’s URI Management for your link structure. If you are using legacy SEO settings or some 3rd party to manage your URLs, most of these steps will be the same with some slight differences. We’ll point out steps which will apply only to URI Management.
It is also recommended you put the site in Maintenance Mode while making these changes. Since you will be changing how cookies behave, it could interrupt current shoppers browsing you site.
Step 1 – Adjust Cookie Settings
Domain Setting ->Domain Details Tab -> Cookie Settings
First some background on how Miva handles cookies. When you first land on a Miva page, Miva creates a session id for you and saves it as a cookie. This will be in the format:
mm5-storecode-basket-id
Where storecode is your unique store code, this cookie will look something like this:

The default setting in Miva for this non-secure cookie is, “Set only on HTTP connections, without secure flag.”
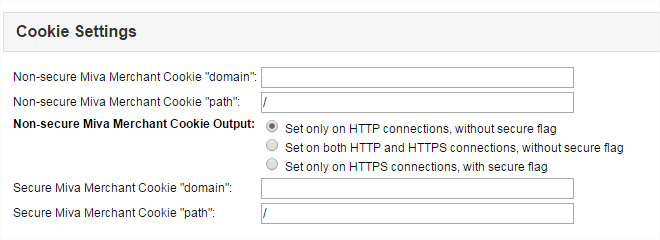
This means that the page must be non-HTTPS for the cookie to be set. Keeping this setting default will cause issues when we update our site to be entirely secure. To avoid the cookie not being set correctly, we need to tell Miva to set this non-secure cookie on all HTTPS pages. To do this we want to change this setting to the 3rd option since all our pages will be secure:
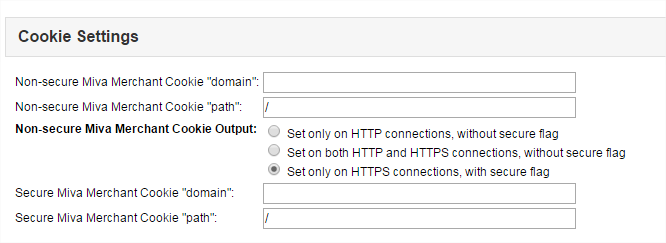
Set only on HTTPS connections, with secure flag.
You could also use the middle setting as well, however since we will be forcing all non-secure pages to be secure, it is better to be consistent and leave it on the 3rd option since after we are done, it should not be possible for your site to serve any pages non-securely.
Step 2 – Update Domain Settings Site Configuration
Domain Settings -> Domain Details -> Site Configuration
The site configuration section is used to tell Miva server paths to your Miva files as well as both secure and non-secure version of these paths. Prior to 9.0004 when URI Management was released, Miva used these URLs to determine the correct path to secure and non secure URLs. For example:
This variable, &mvt:global:sessionurl; would use these settings to output the correct URL:
https://suivant-theme.mivamerchantdev.com/mm5/merchant.mvc?
These variables are typically used in a lot of forms throughout Miva.
The Site Configuration URLs are also used to determine the value of the base href value used in Miva’s head tag. This is an important value which resets the root folder for all assets on the page. Updating the URLs to all be secure will also force the base href to be secure as well.
<base href=”https://suivant-theme.mivamerchantdev.com/mm5/” />
There are two changes we need to make to this section:
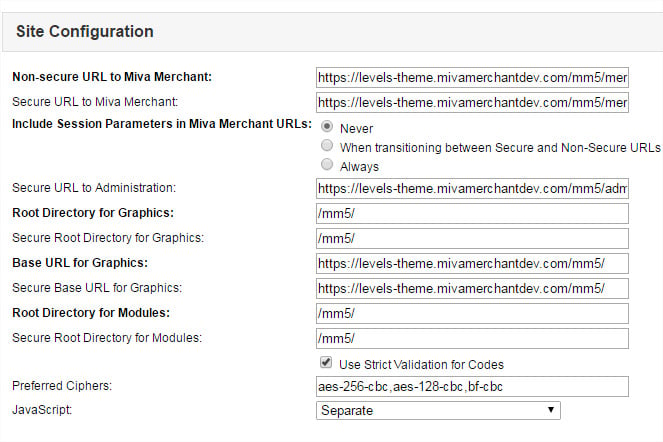
By updating the non-secure URL settings to start with HTTPS, it will make a previously non-secure URL secure. For example, on the basket page there are forms to remove a product and update a product. The form actions looks like this:
<form method=”post” action=”&mvt:global:sessionurl;Screen=BASK“>
Changing the settings above will cause these forms to automatically output your domain with HTTPS. This will prevent you from having to edit each form individually. Changing this one setting will update all your forms globally.
Update Include Session Parameters in Miva URLs to be “Never”
Normally when you visit a secure page Miva will add the Session ID to the end of the URL. However since every page of the site will now be secure we don’t want the session id appended to product and category links. And the session id is not necessarily needed since the same session id is stored in a cookie on the customers computer. To remove the session id from all links we need to change this setting to “Never.” Miva will always read and use the cookie values instead of the parameters passed in the URLs.
It is worth mentioning that if you have a newer Miva store that was created after 9.0004 (12/22/2015), all the links across the site now use the new “urls” component module to control the URLs. This means that the above variable got changed to this:
<form method=”post” action=”&mvte:urls:BASK:auto;” >
Since these variables use the new URI Management to control the link output, they require a second step to force them to be HTTPS.
Step 3 – Update URIs to link to all pages securely
If you’re not using URI Management to control your links, more specifically you’re not using the new “urls” item to control the output of your links, this step is optional, but I would still recommend doing it as it won’t hurt anything and if you end up updating your page templates in the future to use the url variables
(&mvte:urls:BASK:auto) linking to all pages secure will already be in place.
Learn More about URI Management here
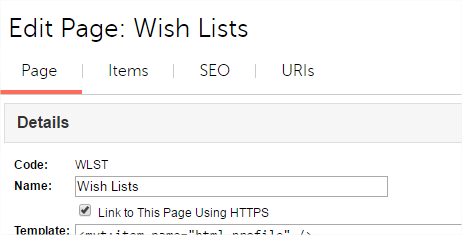
This step tells Miva when it is generating links to any page to generate the link using HTTPS. By default Miva uses this method to link to My Account and Checkout pages securely. If you go to User Interface and edit and page you’ll see a checkbox for “Link to This Page Using HTTPS.” Any page in Miva that should normally be secure will already have this box checked.
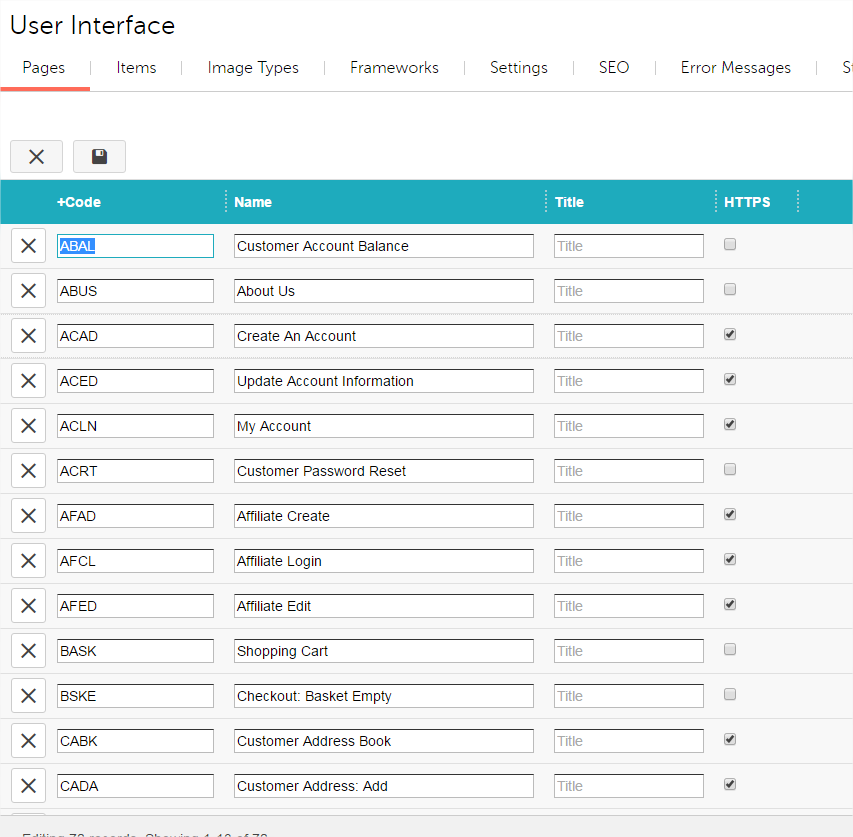
Pages like CTGY and PROD won’t have this option checked by default. Because we now want all links in Miva to use HTTPS, we need to check this box for all pages.
Go to: User Interface -> Pages
On the right hand side click the “Show/Hide Columns Menus” and turn on HTTPS:
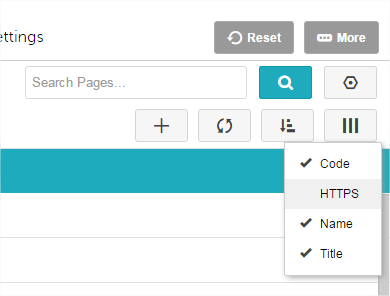
This will add whether the HTTPS checkbox is checked to the batch list allowing you to turn it on quickly for all pages. Use ctrl+a to select all records and edit each record and hit save.
Now that we have completed those three steps above, every Miva Generated link across the site should be output using HTTPS. However, visiting the homepage or any non-Miva generated page still won’t be using HTTPS.
To solve this, we need to implement an .htaccess rule to force every request that comes into Miva to get rewritten to use HTTPS. There are many ways to write this rule and your specific rule may need to be adjusted to accommodate special circumstances.
Note: It is worth mentioning that under URI Management there a URL Prefix and Secure URL Prefix. These settings do not need to be changed. In fact Miva won’t let you make the URL Prefix start with https. Since we’re updating all the pages to use the secure version of the link, the second Secure URL Prefix is all that will ever be used when links are generated.

Step 4: Add .htaccess Rewrite Rule
The .htaccess file is a server configuration file. If you’re not familiar with making changes to this file, it is best to have your developer do this part. Making a mistake here will bring down your entire site.
Open your .htacces file in your web root (accessible via FTP) and add the following code:
## force https
RewriteEngine On
RewriteCond %{HTTPS} off
RewriteRule (.*) https://www.DOMAIN.com/$1 [R=301,L]
This code checks for two things. First, if the URL does not start with www and second, if HTTPS is off. If either condition is true it will redirect the URL to the secure and www version of the URL.
This is also assuming that your SSL is setup at the www version of your domain.
Step 5 – Verify Redirects and Site is Working
Now that the changes have been made, when you go to www.domain.com it should automatically redirect you to https://www.domain.com. Click around your site and verify all pages are now being served as HTTPS and you can successfully add products to the cart and checkout.
You’ll want to use your browser developer tools and check the console to see any pages that have content / forms with non secure URLs and correct these.
They will look something like this:

Or

Step 6 – Complete HTTPS Checklist
Now that the site is serving all pages over HTTPS you’ll want to verify and fix any outstanding items on your HTTPS checklist. Here it is again:
From the list above #3 and #5 are particularly important. If you’re using Miva’s built in canonical tag, then it should automatically update to HTTPS with the changes made above.
Example:
<link rel=”canonical” href=”&mvte:product:link;” />
However, if you have the canonical link hardcode (where the href value is not a variable) you’ll want to make sure this now references the HTTPS version of the page.
Tool to check for hard coded assets
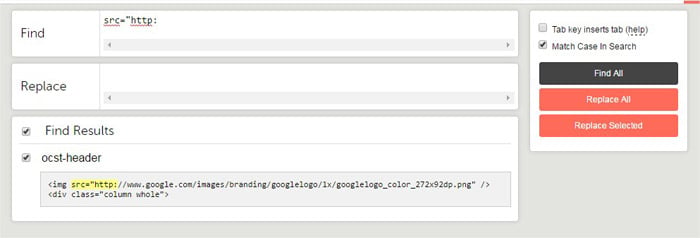
Here is a great tool to check your entire site for hard coded assets which will cause Mixed Content errors. Download and install the free Template Search and Replace Module:
https://apps.miva.com/template-search-and-replace.html
Once installed, you can use to it do a global search and replaces across every template on your store. To find assets which are hard coded to HTTP search for this:
src=”http:
Another string you’ll want to search for is: <mvt:if expr=”g.secure”>
Most sites should not have this, but occasionally, developers will use a conditional check like this to include code only on non secure pages or only on secure pages. You’ll want to identify if your site has this code and correct anything that needs to be changed to always make it work on HTTPS versions of the page.
Follow Up
Converting your entire site over to HTTPS can be a big change. To ensure nothing was missed, for the next few days/weeks following the change make sure you closely watch Google Analytics to make sure traffic is consistent and there are no new crawl errors.
Also, watch for customer feedback about broken pages or mixed-content errors during checkout.
In addition you will want to login into Google Webmaster tools and create a new proterty for the secure version of the website and submit the new sitemap with secure versions of the URLs.
Additional Resources
https://moz.com/blog/seo-tips-https-ssl
Need Help? Let our team of experienced Miva Developers convert your site for you. Contact Sales@miva.com for more information.
By Miva
By Miva
By Miva
Sign up to receive the latest in ecommerce news, articles, whitepapers, and more.
OR CALL 800.608.MIVA


